Using the POS interface, you can record a new sale, create a new customer order, find and process an existing customer order, (for instance, posted online), and process returns.
The POS interface
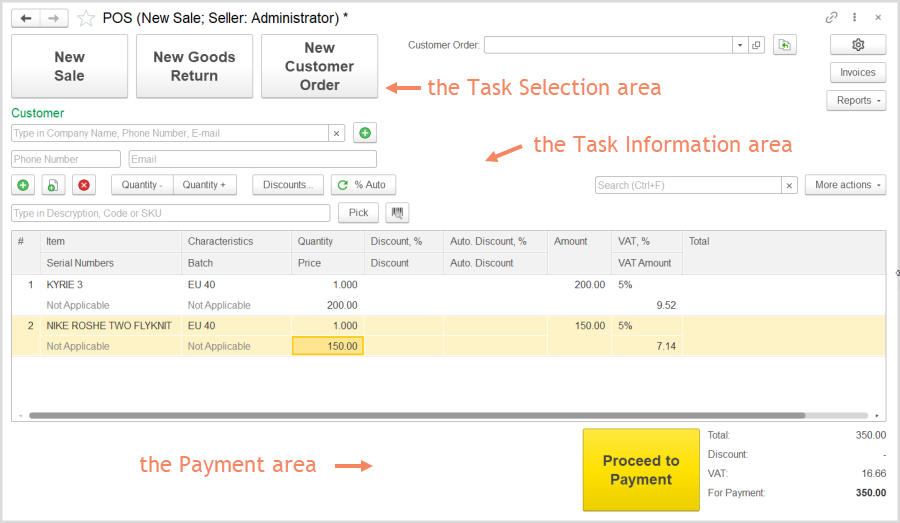
The POS interface comprises the following three functional areas:
- The Task Selection area. This upper area includes 3 large buttons for most frequent tasks:
- New Sale (button): To record a new sale based on existing customer order or without it. For details, refer to POS: Creating a New Sale.
- New Goods Return (button): To process a return of earlier sold goods. For details, refer to POS: Creating a Return3.3.7.3. POS: Creating a Return.
- New Customer Order (button): To order specific goods for a customer. For details, refer to POS: Creating a New Customer Order.
- The Task Information area. Includes customer information and a list of goods being sold.
- The Payment area: Click the Proceed to Payment (button) to open the Payment dialog box. Can be synchronized with opening of a cash drawer.
...
- .
Configuration options
To adjust the interface to you needs, click the Settings (![]() ) button in the upper right corner of the form. The Settings: POS dialog box appears.
) button in the upper right corner of the form. The Settings: POS dialog box appears.

The Settings: POS dialog box
Select check boxes for objects that you may need to change. Click Apply in the dialog box. The fields for the selected objects appear in the upper right area of the form, so that you can use them. For example, you may need to use different cash accounts for cash payments and payments by bank cards.

The POS interface. Configuration options
Also, you can use the Invoices button to open the Invoices list if you need to find some information.
You can click the Reports button to run the Inventory Balance report and get the information on specific item availability.