...
As an interactive report, it shows you the automatically generated cash flow forecast versus actual documents for the specified period and allows you to add certain documents for more correct cash balances.
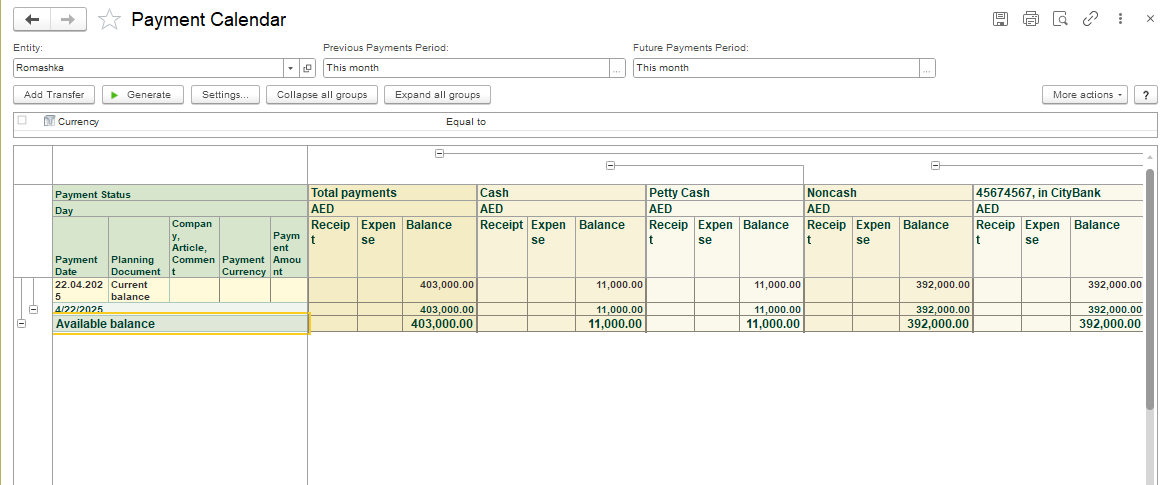
To view and run the reports of the Money module, go to: report, navigate toMoney > Reports of Money.

To start using the "Payment Calendar" feature, please check the settings, go to Administration → navigate to Administration > Settings > Money → put a check mark in the field "Cash Flow Forecasting"

Report Presentation
Planning Period Settings. When generating the payment calendar report, you can set:
• The start date of the period (Previous Payments Period)
• The end date of the period (Future Payments Period)

It isusuallypossible to select a groupingIntervalin the paymentcalendarinterface:
- Byday
- Byweek
- Bymonth
- Byquarter
- By year

Example of setting up a period:
Select the grouping by day for detailed viewing or by week/month for review → select the requiredperiod and
click "Select".

Filter by Entity
This filter will allow you to generate a report only for a specific entity.

Filter by Bank Accounts / Cash Accounts
By default, the calendar generates cash flows for all accounts of the entity, including Bank account and Cash account, withdetailsforeachtype of account.

The user can configure the report to reflect the flow of funds, for example, only on a Bank account. Click Settings in the menu and in the new dialogue box, click Filter field.

In the Edit Filter dialog window press Add new item and select the required filter, click OK to save the filter.

In the dialogue box Settings for report "Payment Calendar", a new Bank Account filter has been added, click Complete to save the settings. Now you can filter the report by a specific bank account.


To see the report only for Totals, click Collapse all groups.

There are two ways to plan cash flow:
- "by orders" — based on orders from the customer and supplier. The following documents are used to plan the cash flow "by orders" → Customer Order, Purchase Order, Proforma Invoice, Proforma Invoice Received.
To include planned payments from the customer/supplier in the payment calendar as planned payments of the selected payment type, select the Add to Payment Calendar option on the Payment Terms tab . By default, the "Add to payment Calendar" field is not active. In order to activate it, the document status must be "In ProсessProcess". This setting is valid for the documents CustomerOrder Customer Order and Purchase Order.


For Proforma Invoice and Proforma Invoice Received documents, tick the "Add to Payment Calendar" field on the Main tab.
...
If you work with regular customers and suppliers, it is more convenient to plan receipts and payments in orders.


In FirstBit, you can easily create actual payment documents (Cash/Bank/Cheque) directly from the Payment Calendar, based on existing planned documents such as:
- Money Payment (Plan)
- Money Receipt (Plan)
Double-click on the planning document to open it directly from the calendar.

Click Generate and select the required document - Bank, Cash or Cheque. You may also cancel the planning document.

Once you create and post the actual Bank/Cash/Cheque document, the planned operation is automatically removed from the plan section of the Payment Calendar and recorded as executed. The calendar view updates to reflect the change in current balances as of the transaction date. At the same time, the planning document will appear in the payment document as a Basis.


Cash Gap and How the Payment Calendar Helps
...