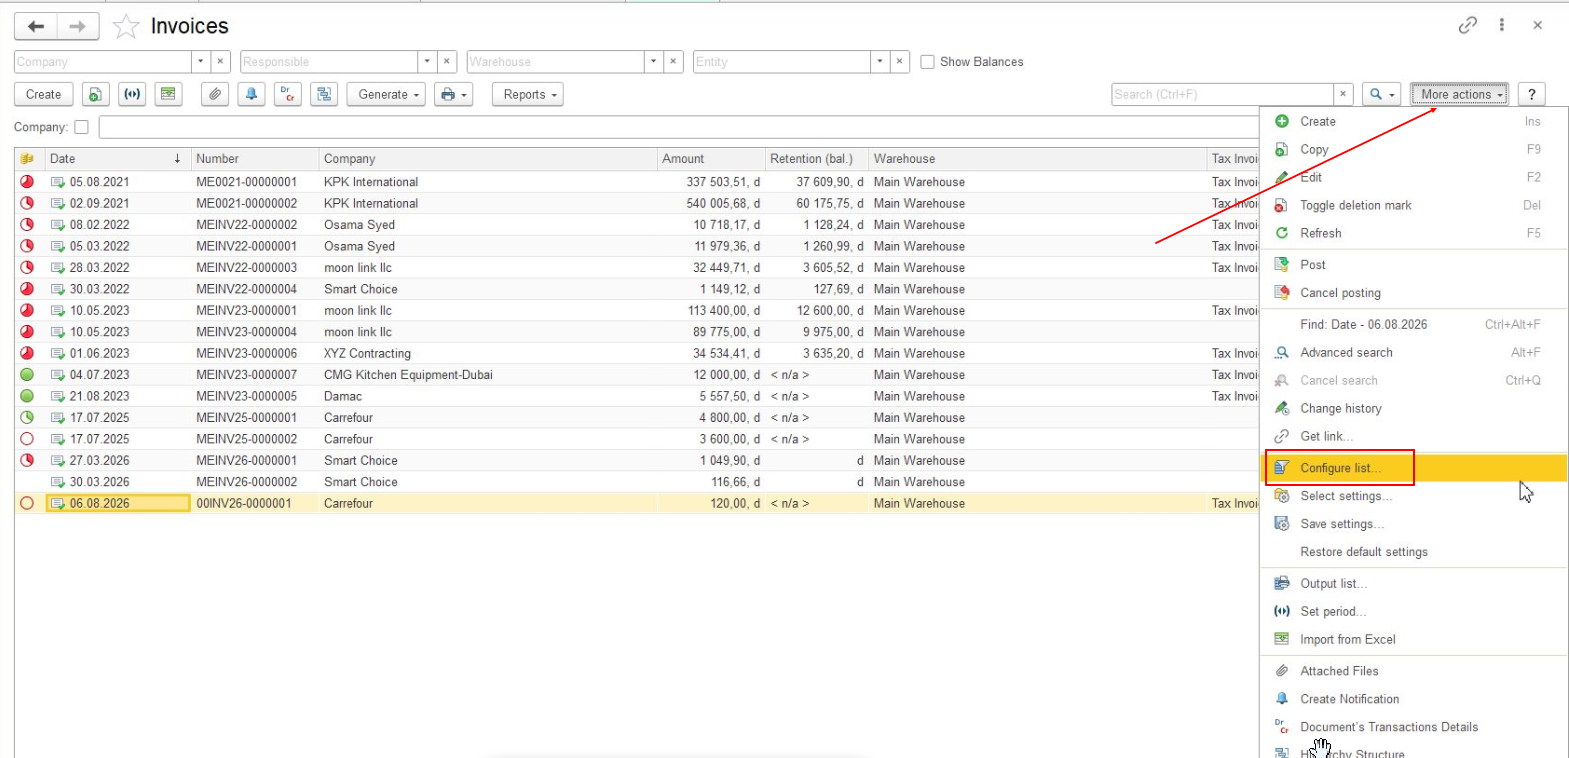
Configure List allows users to configure how data is displayed and processed in a list without changing the structure of the list form.
Using Configure List, users can:
Configure List settings allow users to adapt a list to their current tasks and make it easier to work with large amounts of data.
Note: Use Configure List to configure how data is filtered, sorted, grouped, and displayed. To change the structure and elements of the list form, use Customize Form.
The List settings window opens with the following tabs:
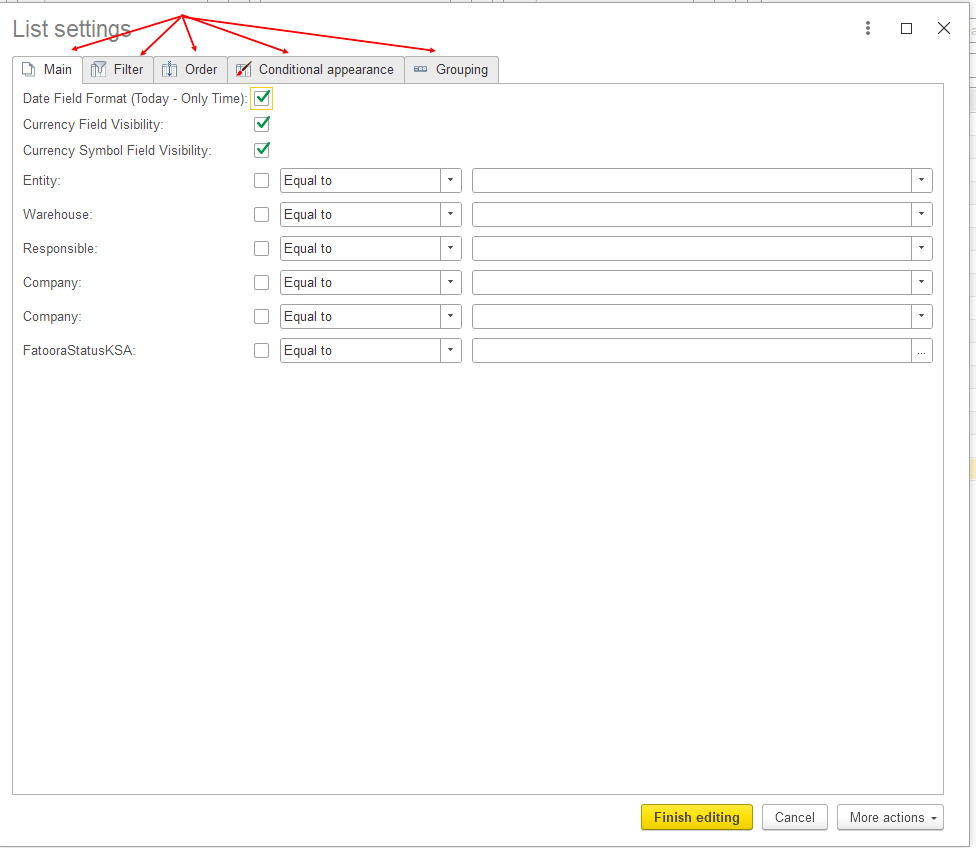
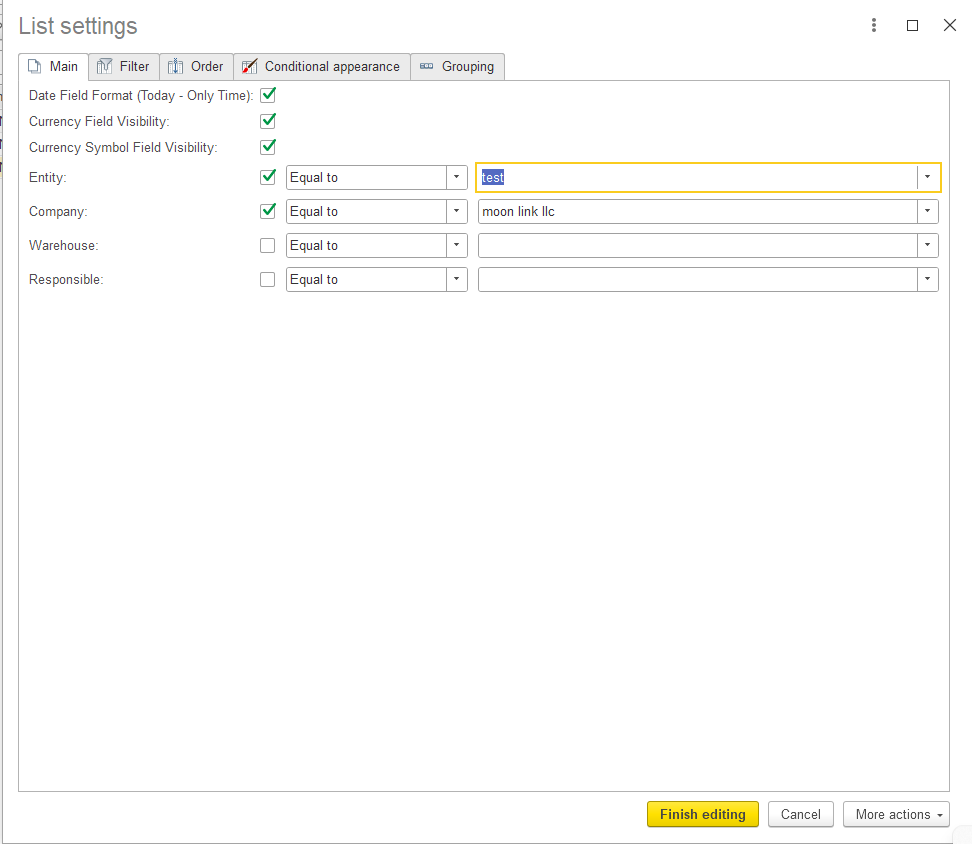
The Main tab contains basic list display settings and allows users to define filtering conditions for individual fields.
Depending on the list, the Main tab can include settings for:
For each condition, the user can:
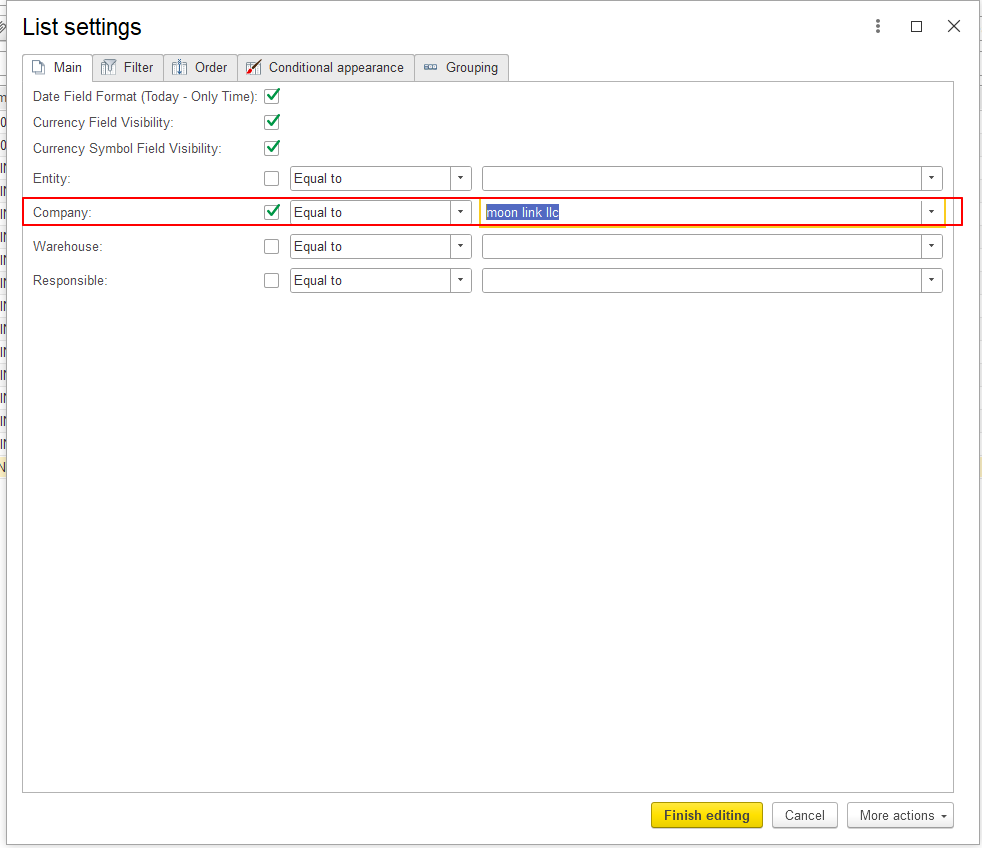
For example:
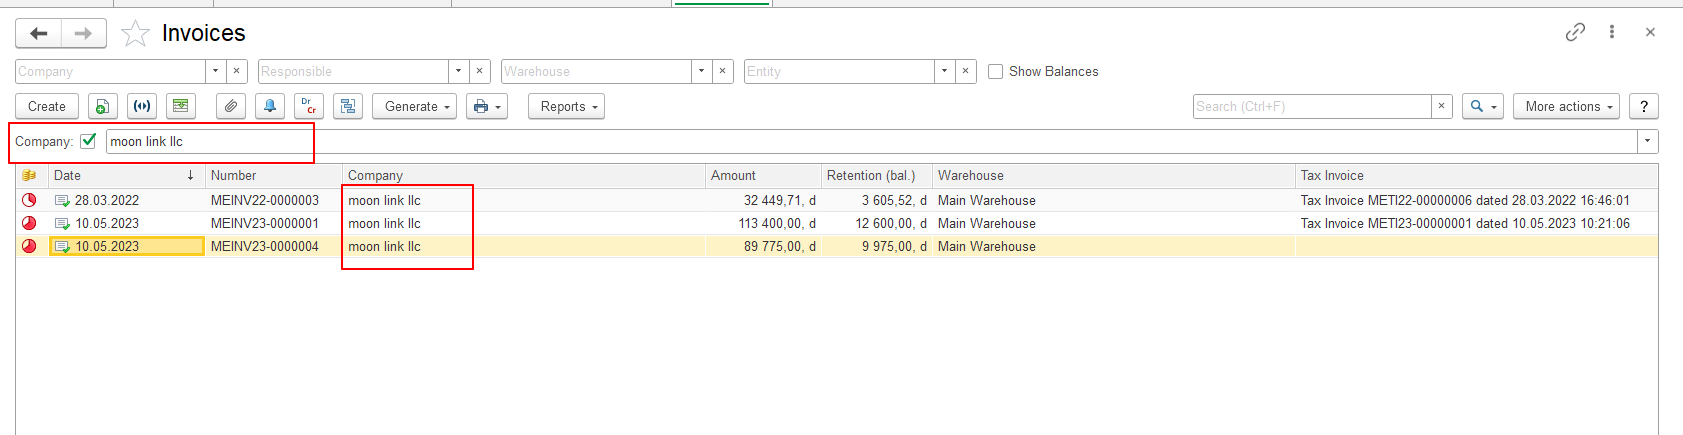
Company → Equal to → Moon Link LLC
After applying the setting, the list displays only documents that meet the specified condition.
Multiple conditions can be enabled at the same time.
For example:
In this case, the list displays only records that meet both conditions.
If no records meet all specified conditions, the list is empty.
The Filter tab allows users to create advanced filtering conditions.
The Available fields area on the left contains the fields that can be used for filtering.
Select the required field and add it to the filter conditions.
For each filter condition, the following values are specified:
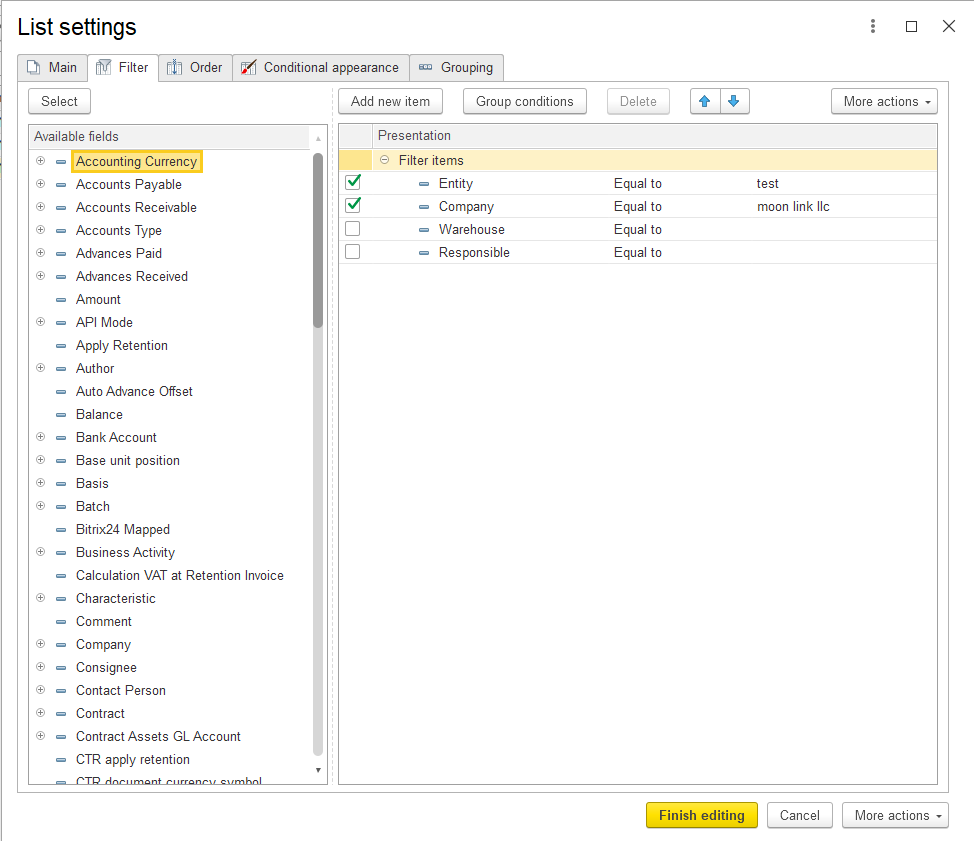
Depending on the selected field, the following comparison types can be available:
| Comparison type | Purpose |
|---|---|
| Equal to | The field value equals the specified value. |
| Not equal to | The field value does not equal the specified value. |
| In list | The field value matches one of the specified values. |
| Not in list | The field value does not match any of the specified values. |
| Filled | The field contains a value. |
| Empty | The field does not contain a value. |
| In group | The field value belongs to the specified group. |
| Not in group | The field value does not belong to the specified group. |
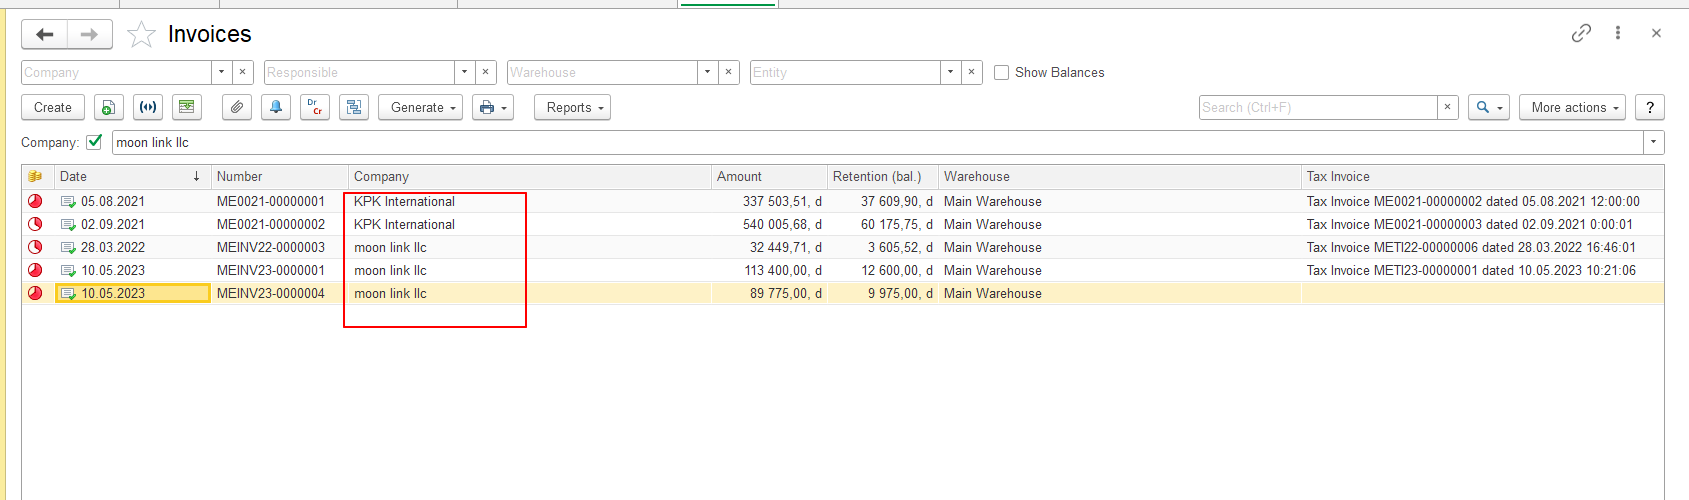
For example, to display documents for several companies, use:
Company → In list → Moon Link LLC, ABC Trading LLC
The In list comparison type allows you to specify several possible values for the same field.
You can add multiple filter conditions.
By default, separate filter conditions are applied together.
For example:
The list displays only records that meet both conditions.
Use the following options to define how conditions within a group are combined:
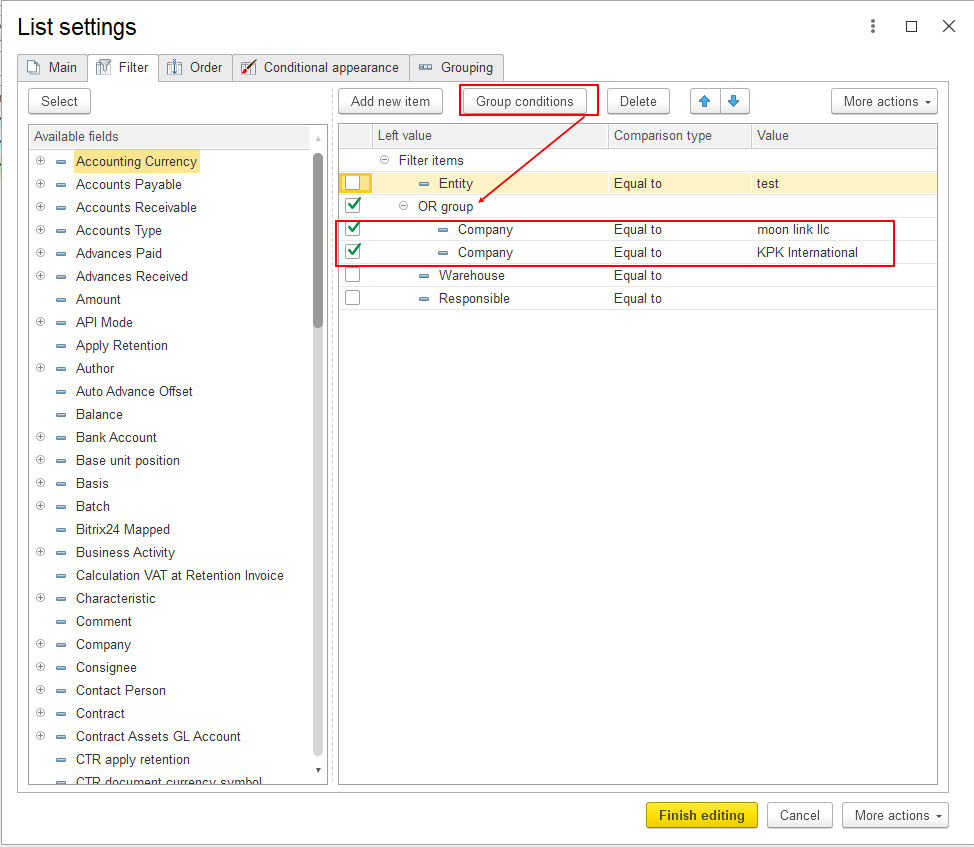
The Order tab allows users to define the order in which records are displayed in the list.
The Available fields area contains the fields that can be used for sorting.
To configure the sort order:
The configured sorting rules are displayed in the right part of the window.
For example:
Date → Ascending
means that records are displayed in ascending order by date.
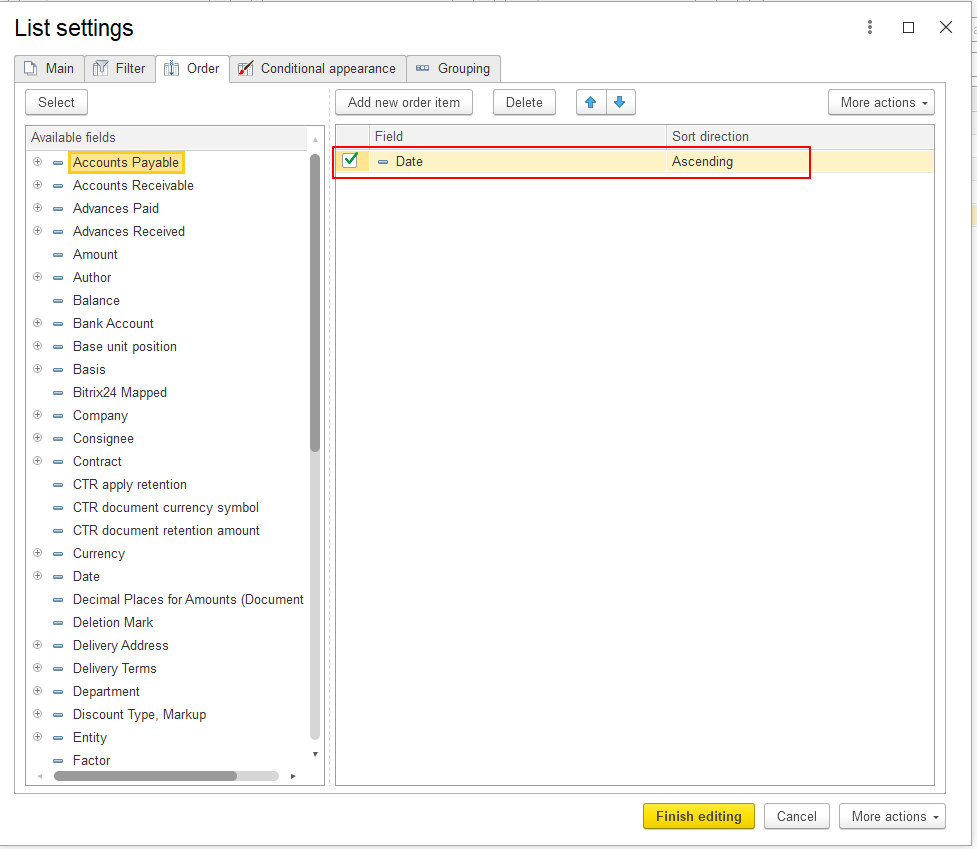
You can add multiple sorting rules. The order of the rules determines their priority. Use the Up and Down buttons to change the order of the rules.
The Conditional appearance tab allows users to change the visual appearance of data when specified conditions are met.
Each conditional appearance rule includes:
The basic logic is:
If the specified condition is met → apply the selected format to the specified field.
For example, you can configure a different appearance for the Warehouse field when a specified condition is met.
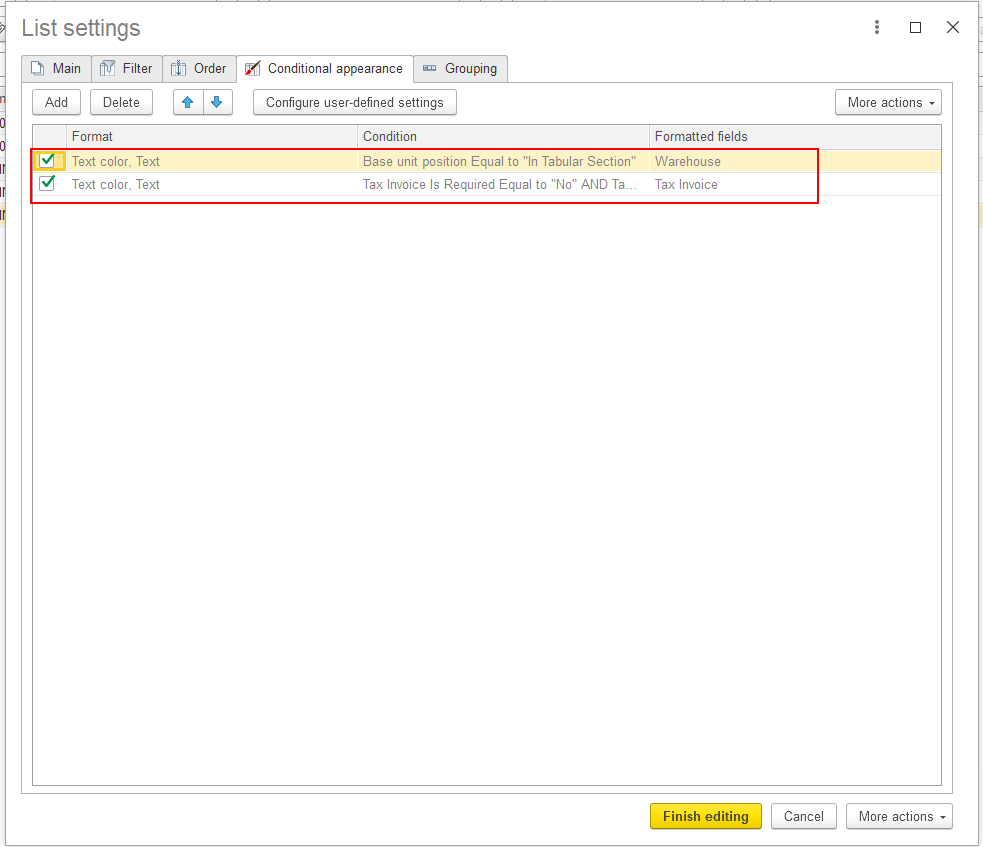
The following options are available for managing conditional appearance rules:
At the basic level, Conditional appearance is used to visually highlight data based on specified conditions.
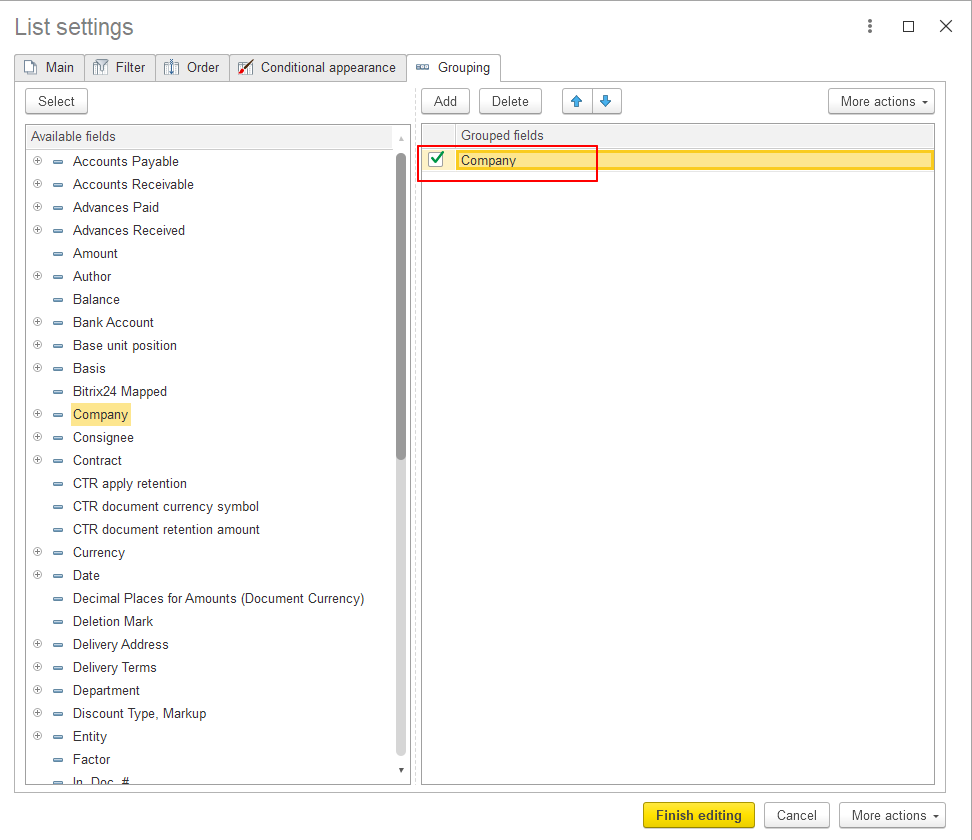
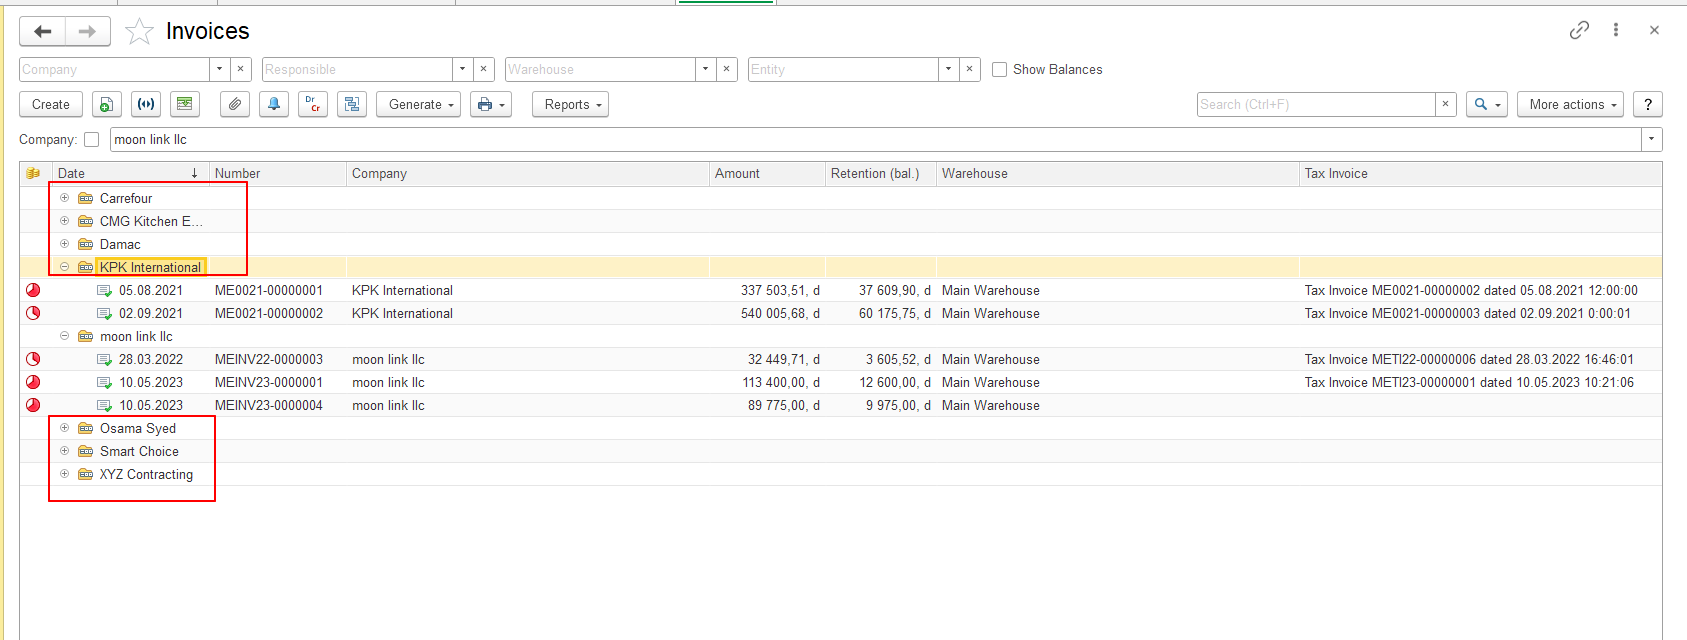
The Grouping tab allows users to organize records into groups based on a selected field.
To configure grouping:
After applying the setting, records are displayed in groups according to the selected field.
After filter conditions are configured, the corresponding filter fields can be displayed at the top of the list form.
Users can:
This allows users to change filter criteria without opening Configure List again.
[SCREENSHOT: List form with filter fields displayed after Configure List was configured]
After configuring the list, users can save the current settings.
To save the settings, select:
More actions → Save Settings
The system saves the current user-specific list settings, including the configured data display and processing settings.
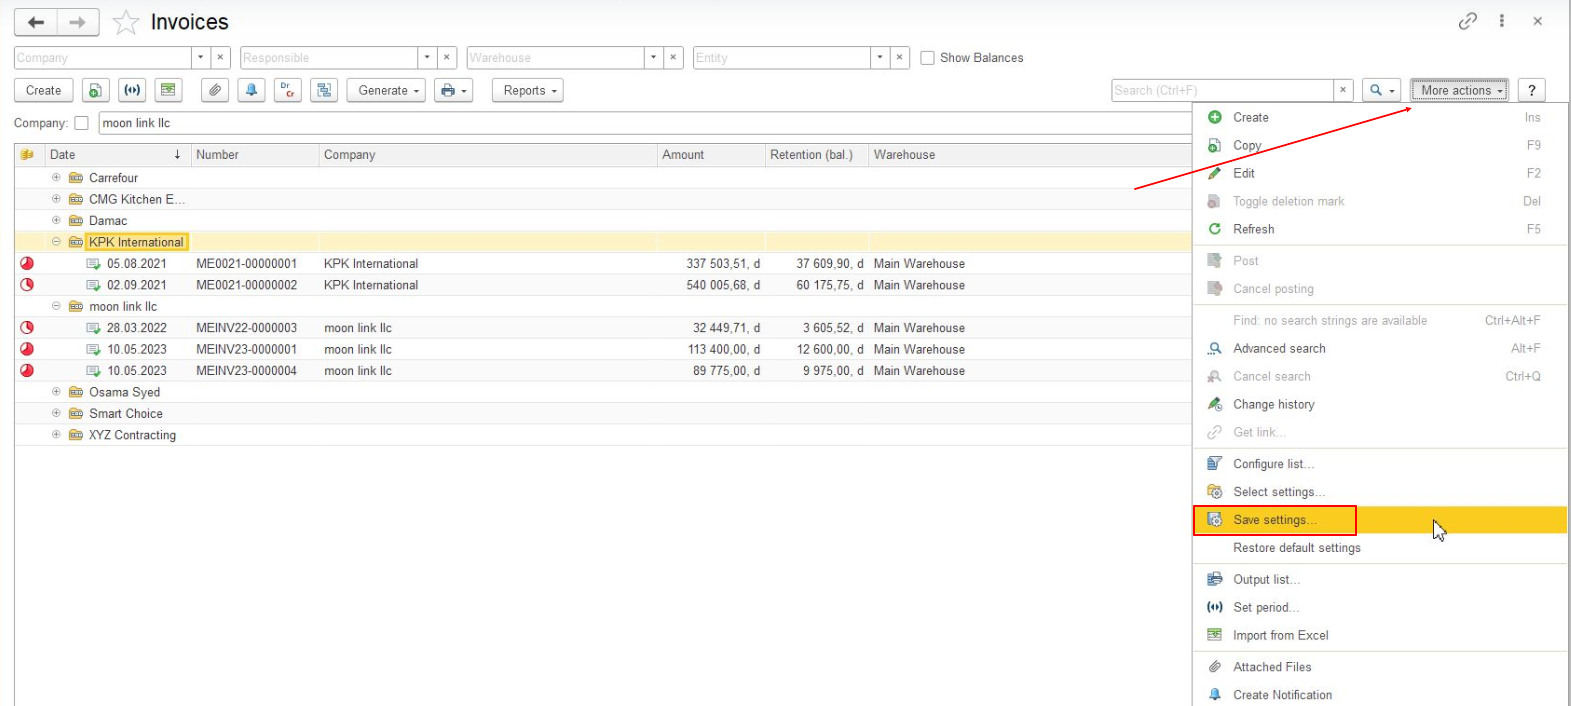
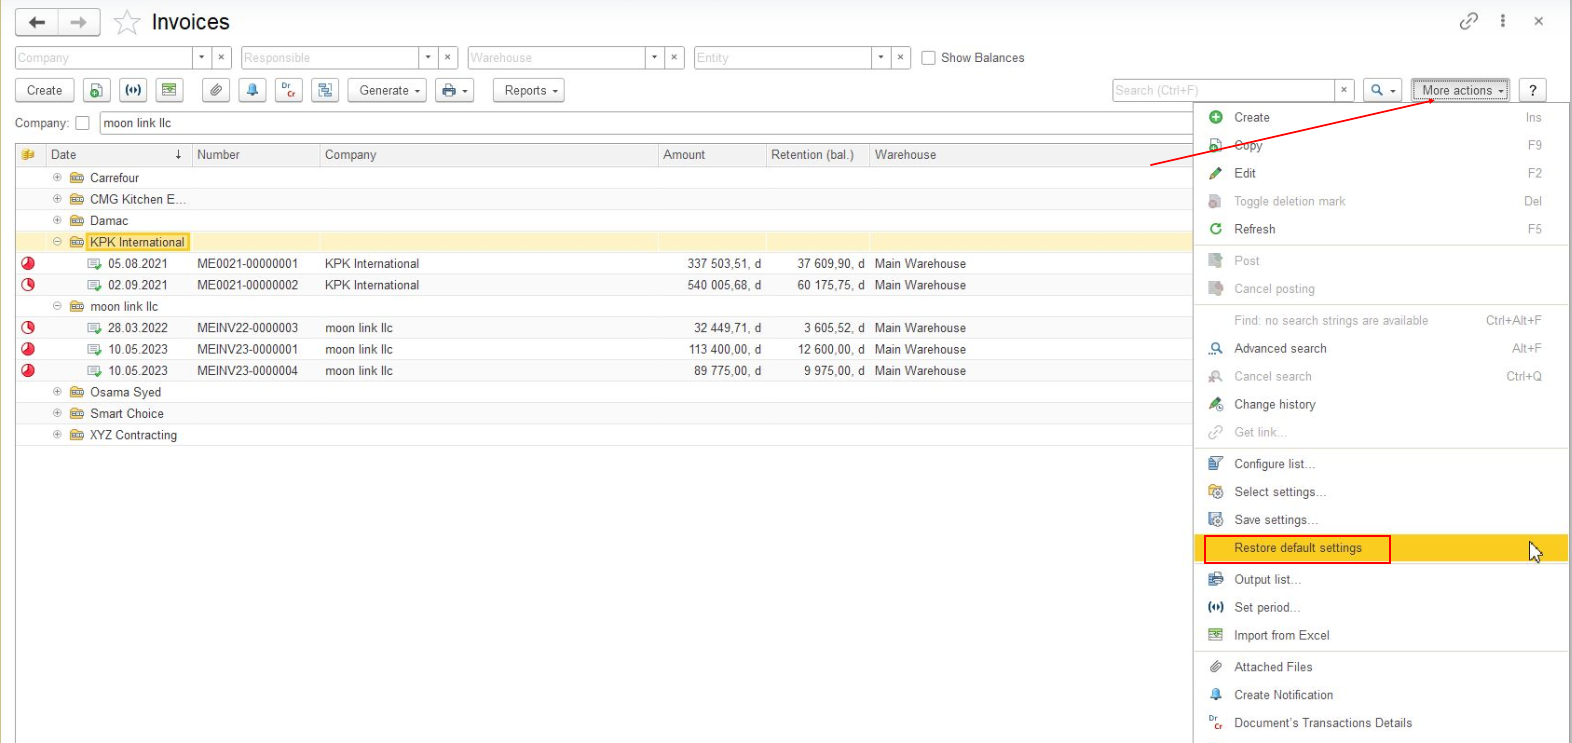
To return to the standard list settings, select:
More actions → Restore Default Settings
The list returns to its standard configuration.
Configure List and Customize Form are used for different purposes.
| Functionality | Configure List | Customize Form |
|---|---|---|
| Configure data filtering conditions | ✓ | ✓* |
| Sort data | ✓ | — |
| Group data | ✓ | — |
| Configure conditional appearance | ✓ | — |
| Configure list form elements | — | ✓ |
| Configure Fast Filters | — | ✓ |
| Configure Command Bar | — | ✓ |
| Change the structure and arrangement of list elements | — | ✓ |
* Customize Form allows users to configure which filters are available directly in the list form.
Configure List is primarily used to configure how list data is filtered, sorted, grouped, and displayed.
Customize Form is used to configure the structure and elements of the list form.
Thank you for being FirstBIT Customer!